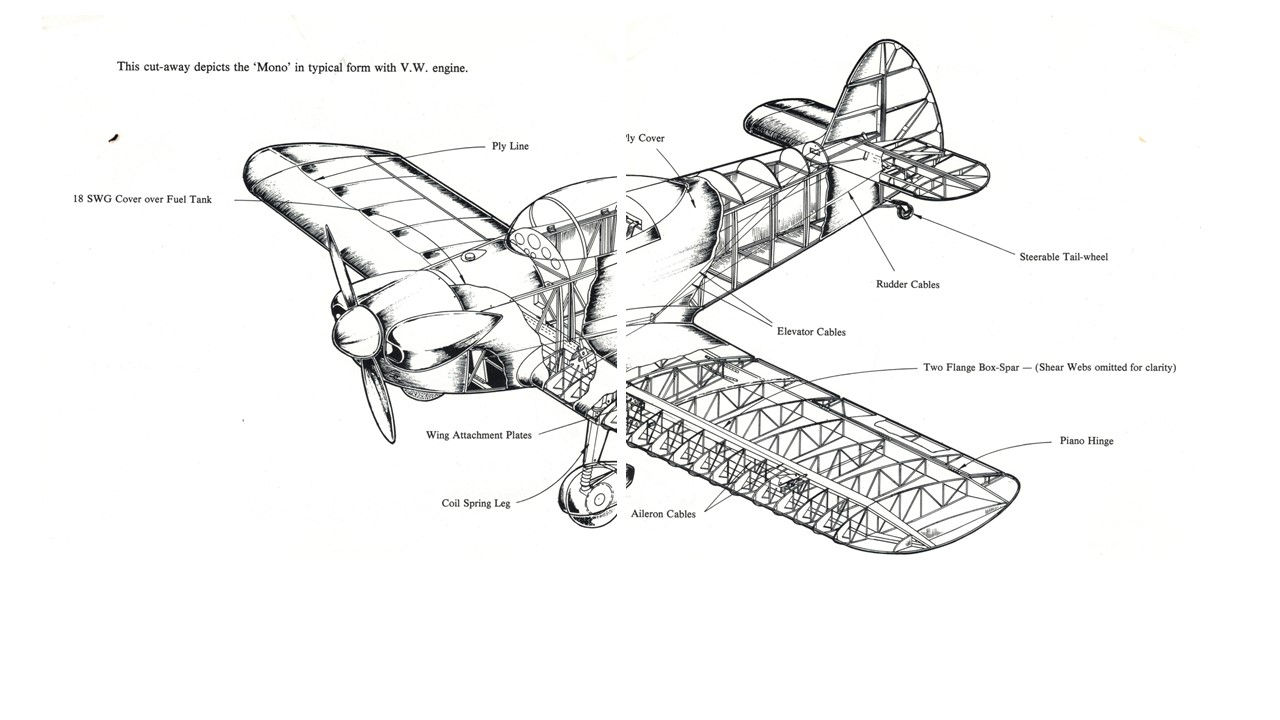
Taylor Monoplane
This is my next project. I have always loved the history of John Taylor's Monoplane. He designed it so that it could be built in his first floor parlour, everything was designed so as to be able to squeeze through the front window to be lowered to the ground when he was ready to move it out to the airfield. So far I have only spent about 20 hours so far, sawing up timber planks to the various sizes needed to get started on the wings. The only wood that I could source in Australia was Hoop pine from Queensland. Currently I have a small stack of timber nearly 3/4" thick and nearly 8" wide. If you can work out how much of that I will need to build this aircraft, can you let me know! I will just have to see how far I get.

This picture shows a solid hour's work plotting out the wing rib on some 1/2" ply. I will mount the ply onto some 2"x2" scrap timber to raise it off the bench and allow room to fit clamps to the board to hold the bits down while glue dries. There are about 20 full ribs to make and I think about 12 half ribs. I have given up trying to understand every minute step of building an aircraft from plans. It is simply too hard. I just stick to the immediate task and amazingly over time it turns into an aircraft, like magic.
I finished the rib jig, today. Luckily I've got a shed full of off-cuts and scrap. With a little luck it might actually work. I am still working on a jig to machine the strips down to 3/16" thick for the wing ribs. It's not as straight forward as I had hoped.

This picture shows where 23 hours of work gets me. I'm up to 4 ribs now. The two trusses are the outer wing panel main spars in their very basic form. There are still extra trusses to add, plus ply front and rear, plus as mad as it sounds nearly 100 bolts for the wing joiner brackets, aileron control horns, undercarriage mounts etc, etc. There is probably more that I haven't noticed yet. I haven't finished my shopping list for the hardware I need to get the wings basically built. I have finally settled on scratch building the undercarriage legs as per the plans. I had toyed with the idea of bent aluminium legs, but the cost becomes rather prohibitive by the time they are imported into Australia, plus I was a bit nervous about changing from the plans too much especially with the engineering involved with mounting the legs under the fuselage. I have had a look at how the legs are mounted on a Onex, it just looks too different to what the Taylor plans show. Plus, it works out heaps cheaper to build it myself.
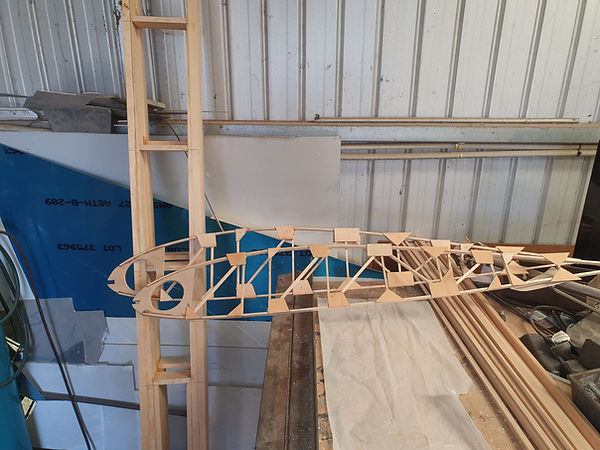
So far I've spent approximately 100 hours to get to this point. All of my wing spars are basically complete bar the webbing. All of the outer ribs are complete. I chickened out of assembling the wing panels just yet as I was a little unsure of the exact spacing of the spars. So I am building the centre section, so that the exact distance is locked in between front and rear spars. I do need to fix the dihedral angle before the centre spars are glued to the fuselage permanently. I seem to spend as much time thinking about it as building. Trying to plan ahead my glueing schedule and the order that I put the bits together keeps the neurons buzzing in my head.

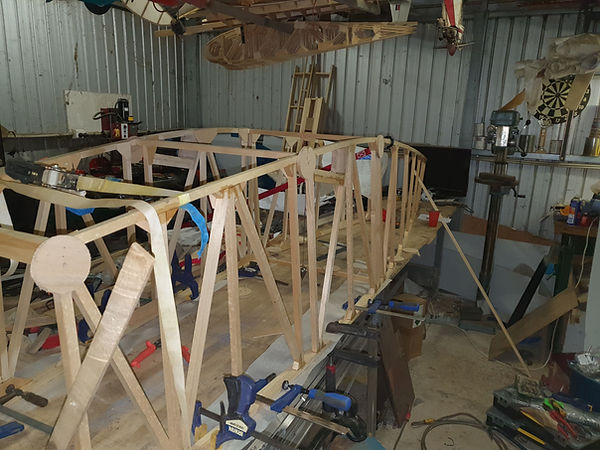
Tonight I finally got up the courage to glue the fuselage sides together. I've only got six cross members glued up. I used a heap of clamps, snatch straps, brad nails and wedges to keep it all aligned. I plan to finished installing all of the cross braces before carefully prying it loose from my work bench. If it all goes 'bang' as it flies apart whilst getting it off the bench will require more swear words than I know.
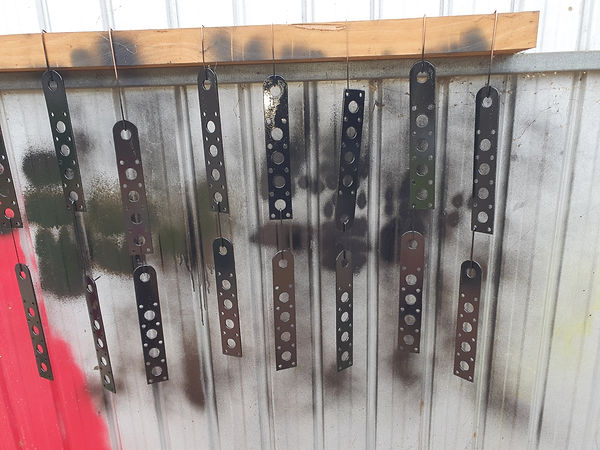
I have a had a bit of break from building, mostly due to the craziness of the Corona Virus crap plus I ended up doing an engine rebuild on my Sonex. Over the last couple of weeks I have managed to pull my finger out and get cracking on building again. I know that it doesn't look much more than a collection of brackets that have fallen out of a Mecano box....but you are looking at a solid couple of days work. These 16 brackets are cut out of 1/8" 4130 plate. The holes are mickey mouse in line with each other so as to not matter which plate or which direction they are bolted together, with 4 of them 3/8" longer to set the required 4 degrees of dihedral. For a wooden aircraft I have spent an awful lot of time parked in front of my drill press.
You can see the undercarriage mounting brackets which required a bit of head scratching to get lined up with the correct angles and weld them together. I used clecoes to hold the wing brackets in the correct spot on the wing spars. I am still waiting for the correct size tube to continue making the undercarriage legs. I have got some Jabiru wheels, axles and brakes coming. I believe that John Taylor used old Avro Anson tail wheels for his, however they are a bit thin on the ground these days hence I've gone down the Jabiru path. I haven't made my mind up yet which type of master cylinder to use. I am not going to bother with separate braking, I don't use it on the Sonex, it's simple and honestly it works a treat.

This is my cheat's way of making my spar look cool. Trying to accurately cut and glue many layers of timber and keep it all perfectly aligned is bloody hard. I clamped everything down on my work bench which is perfectly flat so that one side is perfect, however the other side came out a little wonky. By feeding it through the thicknessner it makes a perfect surface for glueing the webbing on. On this picture and the next one, you can see that I have applied the varnish to seal the grain on all the exposed internal wood surfaces. So far I have spent about 130 hours in actual working time. Daydreaming about how the hell I am going to do the next step is about the same again!


It has been a while since I've managed to do some work on the airframe. I built a new shed, fixing up most of the problems with my old setup. The floor is beautifully flat and level and epoxied. I custom made wheeled trolleys for my bandsaw, table saw and jig saw which places the cutting tables at the exact height of my workbench to make it easier to feed out sized pieces of ply or timber through each gadget. I actually felt pretty proud of myself. It is now much easier to handle the large bits and pieces. I still need to open the roller door to feed a 12 ft long strip through the thicknesser or table saw, but I don't tie myself up in knots now doing it. The good news is that I am still as messy as ever as you can see!

The fuselage is really starting to look like an aircraft finally. I've still got to fit the shaped strips along the longerons in between the verticals so that the skin will fit flush against the longeron sides. The rudder is not completely finished, but I had to clamp it on just to get my jollies so that it looked cool. The tail plane is almost there.

I could only purchase ply sheets in 4 ft square. This will give me plenty of practice scarfing the sheets together. I have read numerous books and researched the various home made methods of doing it, but in the end I just marked the area accurately with a pencil line and got busy with an electric orbital sander and evenly cut through the layers of the ply. It turned out better than I though for my first effort. The true test will be to see how it goes when I attached it to the fuselage sides.
